We've really gotten into our "study" of the life cycle of the butterfly. Our caterpillars are well on the way toward their transformation. Those 5 little critters we received in the mail became 5 fat and juicy caterpillars!

They then migrated from the bottom of the jar to the top were they suspended themselves one by one, upside down like little "J's" .

No matter how often we looked we never saw that actual transformation into a chrysalis! Those sneaky guys always planned it when we weren't looking! Now they are hanging there-barely a resemblance of their former. The chrysali are beautiful! Earth colored pods with opalescent spots that catch the light. Still and sleeping now with the most miraculous changes within.

The kids and I decided it would be the perfect time to resurrect another project I came up with for Winter Craft Day at Dea's old elementary school. That year the kids were studying different time periods of art history. For the modern art unit, I thought it would fun to make some kind of mobile. I've always been attracted to Alexander Calder's mobiles-especially the the ones emanating from a base as opposed to being suspended from the ceiling. To bring a little summer to our winter we used a butterfly motif that I found online. The kids made some amazing mobiles that year!
Now that we had plenty of time on our hands for the project, I improved upon the original design and we went to town.
Here's how it's done and what you will need:
Various specialty art and scrapbooking papers 
Acrylic paints
Rock
18 gauge Floral wire
Old fashioned clothes pin
Pipe cleaner
Glue stick
glue gun
duct tape
bottlenose pliers
Black floral tape or colored wire
Feather craft boa of faux fir fabric(long hair)
Find a nice rock that would make a good paperweight or sturdy base .
Wash dirt off rock, dry and paint with acrylics.
Paint your clothes pin-this is the butterflies body .

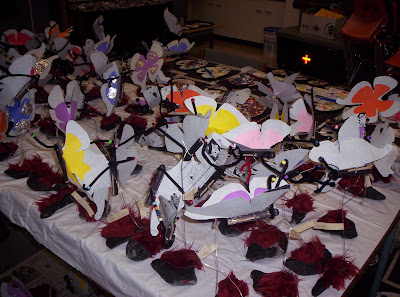
Using 3-4 different specialty or scrapbooking papers, cut out a butterfly shape in various sizes so that they can be glued and layered onto each other. It’s best if the bottom(and largest layer) is a very thick paper).

Make sure you leave a thin space between the butterfly wings where the body would be(see pic). This space will eventually be glued to the inside of slit in the clothespin. You can also cut out smaller shapes to glue onto butterfly or even use stickers, buttons, glitter-whatever you fancy.
Using glue gun, put a spot of glue in the middle of the wings
Take an 18 gauge floral wire and wrap floral tape or another colored wire around it.
Make a loop at the bottom-this will be where the wire is hot-glued to the rock.
Attach the other end of floral wire to the clothespin by twisting it around a “leg” of the clothespin underneath the wings or around the “head”. You may need to use bottlenose pliers to twist the wire good and tight.
Take a pipe cleaner( the antennae) and twist around the clothes pin head and tighten with bottlenose pliers.
Using glue gun, attach loop of floral wire to top of the rock.

When wire is secure and cool you can hot glue a chunk of feather boa or faux fir to the duct tape around the base of the wire. Looks like wacky moss and conceals the duct tape!

You’re done! It may take some adjusting of the wire to get it to keep the butterfly upright. You don’t want your wire so stiff that it won’t move in a breeze or so limp that the butterfly just flops all the way over!
Set your butterfly by a fan or open window and watch it “flutter” in the breeze!


And don't forget to enjoy some APHID POPS or NECTAR with your new butterflies!!!!Goya makes yummy nectars the kids can drink like a butterfly. Don some wings, get a proboscis(straw) And drink up!

Or mix up green KoolAid and pour into an ice cube tray. Stretch plastic wrap over the top and poke a toothpick into each compartment. Freeze.
When frozen, pretend you're a ladybug and eat em' up!

P.jpg)
P.jpg)
P.jpg)
P.jpg)
P.jpg)