Early on we had established a Family Holiday Shopping day where we would got to the malls, split up and buy gifts, meet up and exchange kids, and head off to shop until lunch/dinner. I was trying create what I thought would be like an old fashioned day of shopping in a quaint New England village or an exciting shopping spree in NYC. NOTHING of the sort here in Alaska!!! There is nothing very quaint, New Englandy or NYC-ish in Anchorage! We've got box stores, department stores and strip malls. Yeck.
Driving home from our last Holiday Shopping day a couple years ago, I asked everyone,"Do we LIKE doing this?!?!? I mean, besides going out to a yummy lunch/dinner do we enjoy a family day of joining this crazy cacophony of people pushing, shoving, and bitching? Do we want our kids to be inundated with people salivating and frothing at the mouth over a video game or action figure?" The answer was a resounding NO from all. We weren't digging all that advertising blasted into our ears and faces, the long crabby lines, the overstimulated kids, dirty dressing rooms, and the unsatisfying feeling of pulling something off the shelf, depositing payment, and heading home to throw it in a box. Don't get me wrong-I love prezzies! And I've always got a list of stuff that I feel I "need", and a small trip to a store to purchase something you know a loved one is really excited about can be fun, but nothing compares to some wonderful little thing that was made by my child. It's a different world. They are SO excited about giving that present! They painstakingly wrap that gift with pride and are just wiggling with excitement as you open it up. And the pride on their face when they see your reaction...precious beyond words.
Needless to say, the kids (as well as Huz and I!) have eased into the idea of making a special present or two for each immediate family member, and they've happily branched out to include some extended family and friends as well. Of equal importance, is the fact that starting last Christmas, Huz and I have been making many of the gifts that we have given our kids. We've had so much fun making them, too! Trying to finish these projects in secret was challenging but definitely part of the fun! There is something so wholesome and rich about taking the time and care to make something special. Each sibling has watched and even helped us as we've made the other sibling's gifts. They've seen our hearts put into these things and I hope the love registers deeply within when they receive our gifts.
Below are some of the gifts we made from last year. I'll post a couple more with how-to's later this week.
This is the second Waldorf style baby That I've made for Lo. These babies are just so wonderful! So much more huggable and lovable than those macabre plastic babies. This one, Lo named Star. She found her cuddled in some silkies in a basket cradle on Christmas morning.
Dea made some great book marks. This one was for her Dad. and she also made some more feminine ones for the female
relatives using
velvety ribbon, beads and silver pendents.

 Table puppets! A family of four and Mother Earth. Instructions for making them can be found in Freya Jaffke's Toymaking with Children.
 We made some of those fun layered Cookies in a Jar things. I think we did the same with a layered hot cocoa mix. I'll have to find the instructions to share... The little painting is one of the ones that Lo created with acrylics and canvas. I got the idea from MOM IN MADISON! Huz has the hand print version in his office. Around Martinmass the kids made these beautiful lanterns. Simple!
With Modge Podge, glue ripped pieces of colored tissue paper on canning jars. Wrap silver wire around top lip of jar. String various sized glass beads on another piece of wire and connect ends to the wire on lip.
I really enjoyed making this earring holder(it's seen a bit of use) for Dea. I picked up and old picture frame, painted it black and staple gunned a piece of window screen to the back. (We have a neurotic old dog that has ripped his way out of our window many times in the past due to being left alone in the house while we were out-so we have plenty of scraps!) I used mixed media to create the frames images. It was lots of fun beading a bunch of earrings for Dea as well but it turned out that her ears are sensitive to even sterling silver.

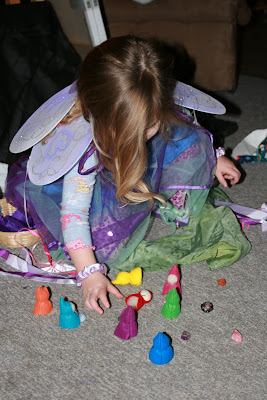
 These little Gnomes came tucked in a basket, each with it's own color coordinated magic gemstone! Again, Toymaking with Children has the instructions.
Dea made these beautiful eco-friendly Japanese style hangings with handmade specialty papers from around the world.

What you need for 1 hanging:
2-3 sheets of large size specialty paper-Lotka, banana fiber, spun silk, recycled rag, etc. (can be found at fine art stores.)
Modge Podge
Wide sponge brush
Glue gun
Bamboo(Micheal's Craft Store)
Hemp string(or whatever you think looks nice!)
Sprig of eucalyptus
What to do:
Chose one of the papers as your base piece-it should be the thickest piece of paper. Cut to measure about 25 x 14.
Your second paper should be a lighter weight paper and will be the same length as the base but the width should only be about 1/4th to 1/3rd of the base piece. You can cut out this second piece but we found that if you TEAR the paper, the rough erratic edges are more aesthetically pleasing! If your paper is thick or tough, just use a saturated Q-Tip to moisten a rough line down the paper and it will be easier to tear along that wet line. Rice paper is great to use for this second layer because it is light weight and blends into the base paper.
If you want, you can add a 3rd piece of paper making it's width 1/2 of the second. Same process as above.
Using Modge Podge, coat the back of your second piece of paper and glue to the base-it should line up close to one of the base's sides.
You can then add a 3rd piece of paper to the second or just tear random pieces of a 3rd paper and glue to the second as Dea did above.
With a wide brush coat the whole front of the hanging with Modge Podge. This will give a blending effect of the 2nd and 3rd papers into the base.
When dry, glue a shoot of bamboo(make sure it's hollow inside!) about 8-10 inches long to the bottom portion of hanging with a glue gun. This will serve as a little holder for your eucalyptus.
Hot glue 2 pieces of bamboo-a little longer than the width of the hanging-across the front of the top and bottom of the hanging.
In order to hang your hanging, string your hemp cord through the bamboo and tie the ends or just tie the ends of the cord to the ends of the bamboo.
Lastly, choose a sprig of eucalyptus or any dried plant to put in the bamboo holder.
Beautiful!


8 comments:
Everything is wonderful but tell DEA that her bookmark really speaks to me, just beautiful!
I agree wholeheartedly with everything you said. Great post.
Yes and what a great BIRTHDAY prezzy it would be ;) ;)
Such great ideas - and so many lovely creative gifts.
We feel exactly the same way. While we do buy a few things online or at local craft fairs, we make a very large percentage of our gifts every year. It is fun, meaningful, and memorable. We spend a lot of time making them, but I think it is worth it.
Now if only we could convince our more distant relatives that we only see once or twice a year over the holidays...he he. ;P
I couldn't agree with you more. Home made presents are the best! I've seen that same excited look on my own kids faces when they give something that they have made themselves...they're so proud. You have offered so many good ideas on this post, thank you.
Now I want to make something! Maybe during my preschool's winter break I can find some time. I agree with Sharon on the bookmark, a lovely gift indeed!
I love that picture of Lo...is she wearing wings? We're making lots of little things this year...it's like extreme craftiness around here. I don't have enough horizontal surfaces to lay out everything that needs to dry :-)
What wonderful ideas, you have captured the Christmas spirit wonderfully. I think i may be stealing the idea for the earing holder - it looks wonderful and simple
The crystals are sooo cool. I love them!!!! You are so creative! The pictures of the Gnome story you told...that was soo cool and creative!!!
Post a Comment